


Grooving platform “MINI”
Original price was: 41.00€.36.90€Current price is: 36.90€. (w/o VAT 36.90€)
Cut perfect grooves & rabbets!
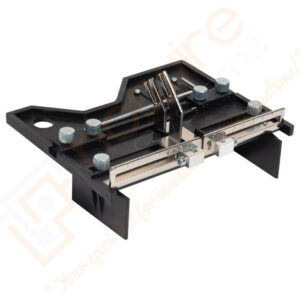
The foam Grooving platform – “MINI” (Tube seat groover) is designed for cutting different diameters grooves and recesses for water pipes, electrical cables or for construction fittings. The foam grooving platform – “MINI” works only with the bendable blade Type-G30! (NB! sold separately). The main advantage of the “MINI” foam grooving platform – is the size. You can easily use it in hard-to-reach places, for example in the corners or close to walls.
Description
Unlike the more advanced model (the Grooving platform), the “MINI” platform/adapter is primarily used for cutting small grooves. The “MINI” foam grooving platform have 3 slots on each side. The size between the farthest slots are 31mm. It allows to cut grooves and recesses up to 33 mm (1.3 inches) wide. The cutting depth can be also adjusted by moving the blabe up or down.
- Nine blade installation combinations.
- Fast and easy blade installation/replacement.
- Small size of the platform.
- Indispensable in hard-to-reach places.
- The platform works only with bendable blade Type-G30! (sold separately).
The overview of “MINI” foam grooving platform.

| International Express delivery is carried out by TNT, UPS, DPD, Regular Post. Shipping & Delivery terms!
Additional information
| Weight | 0.3 kg |
|---|---|
| Dimensions | 6 × 5 × 6 cm |
| Important | When using optional accessories, always take into account the length of the blade fixed in the holders of the platforms and choose/adjust the correct blade heating cycle. To do this, follow these steps: NB! Do not use the maximum power without the need for a long time. This can lead to strong cutting blade deformation or HWS250! breakage. |
You may also like…
-

-
-10%
- Optional accessories
Bendable blade Type-G30!
- Original price was: 14.00€.12.60€Current price is: 12.60€. (w/o VAT 12.60€)
- Add to cart
-
-10%
-

-
-7%
- Hot knife cutters & KIT's
Hot knife cutter HWS250!
- Original price was: 170.00€.158.10€Current price is: 158.10€. (w/o VAT 158.10€)
- Select options This product has multiple variants. The options may be chosen on the product page
-
-7%
-
-
-5%
- Optional accessories
Grooving platform “GROOVER”
- Original price was: 43.00€.40.85€Current price is: 40.85€. (w/o VAT 40.85€)
- Add to cart
-
-5%